Create
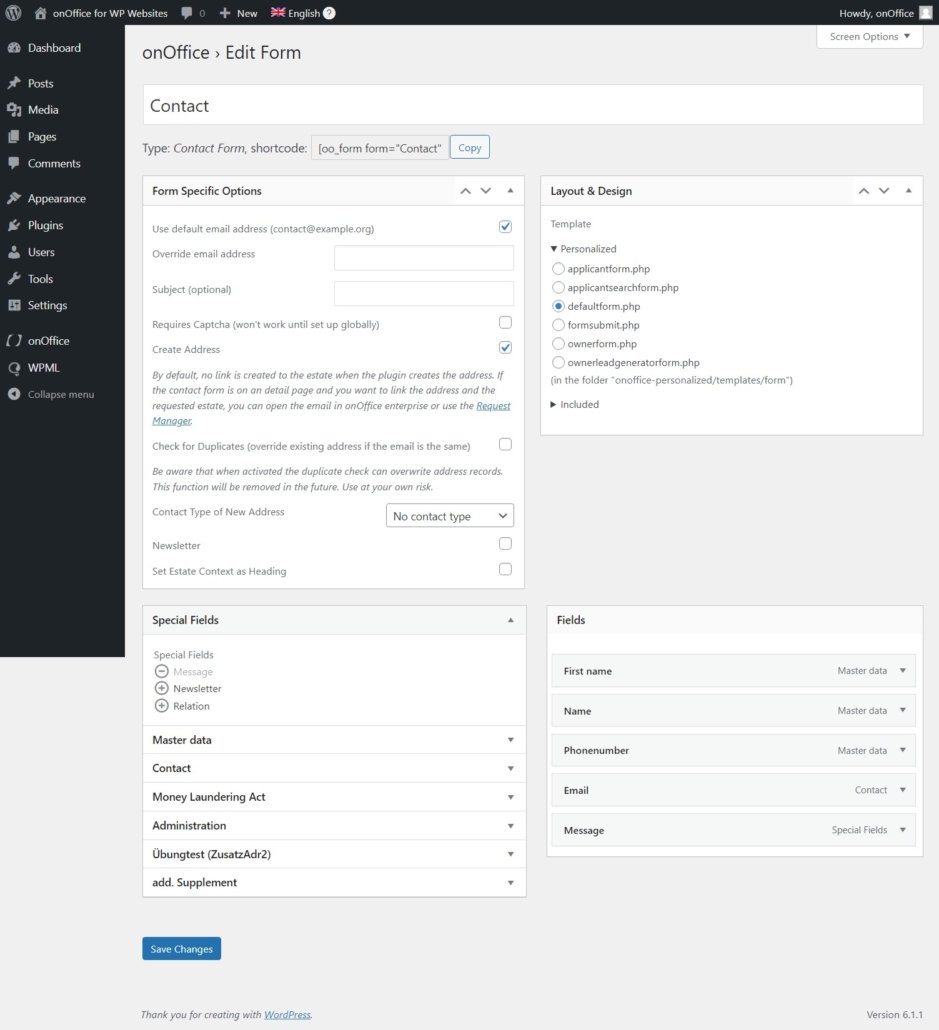
Navigate to onOffice > Forms, click “New” at the top and select “Contact Form”. Enter a name, such as “Contact Us,” and save the form.
If you see a warning that you still need to enter a default email address, go to onOffice > Settings, enter one under “Default email address” and save. Then go back to onOffice > Forms.
Copy the shortcode and paste it on a page where you want to display the contact form. You can also create a new page for this purpose.
Customize
When the form is submitted, the plugin always sends an email with all details to. This email works similar to portal requests: when you open it in onOffice enterprise, you can create the related property and address with just a few clicks.
Alternatively, the plugin can also create records in onOffice enterprise automatically. To do this, check the “Create address” box in the “Form-specific options” box.
You can add fields from onOffice enterprise to the form in the same way you do with real estate fields. If you expand a field with the arrow, you can add more settings.
Hidden fields make it possible to enter additional information without it being visible to the user.
Note: To be able to use the “Hidden fields” function from plugin version 5.0, individual templates must be updated accordingly.
If you want to add a newsletter checkmark, you should use the “Newsletter” setting in the “Form specific options” box. When it is set, a newsletter checkbox will be added to your form. This is better than adding the newsletter field to the field list below, since the field in onOffice enterprise is a single select, not a checkbox. Make sure that double opt-in is enabled in onOffice enterprise.
You can also add a contact form on the detail view later, so visitors can directly request the property you are viewing, as described in the advanced features.
If you would like to display the form input of numerical values with thousands separators to make large numbers clearer, you can activate this in the plugin settings.
Note: To be able to use this “thousands separator” function from plugin version 5.0, individual fields.php files must be updated
Form types
The different form types have different purposes:
- The contact form (defaultform.php) allows visitors to send you their basic data and an arbitrary message. If used on the detail page (see Estate contact form), it might be linked to an estate.
- The interest form (applicantform.php) allows visitors who are looking for a new estate to send you a search profile.
- The owner form (ownerform.php) allows estate owners to submit their contact data and their estate’s data to you.
- The applicant search form (applicantsearchform.php) allows estate owners to see how many anonymized potential matches you have for their estate in your onOffice enterprise.
Why are no requests for property being received?
As soon as a contact person of the broker type is assigned to the property, the mails are always sent directly to this contact person. If no contact person is stored, the standard e-mail from the settings is used.
How do I create a GDPR checkbox in forms?
- It can be added for all forms in the “Special fields” GDPR (checkbox), where you can set the default value, a custom label and the mandatory field.
Related links
How can I customize the success and error messages?
Currently, the success and error messages are directly in the form and need to be adjusted here. An extra PHP file can be created in which these are designed separately. This must then be “required” in the form file.
How do I create a newsletter form?
- To create a newsletter subscription form, you need a contact form. Here you can check the box for “Newsletter” in the Form Specific Options. Include the shortcode at the relevant place where you want the form to appear.
- In onOffice enterprise, the double opt-in option should also be activated.
